
DIY CUSTOM GRAPHIC HOODIE W/ FAUX LEATHER APPLIQUE
Have ya’ll seen my latest pride and joy?! Nah, I’m not talking about The Child, or anything like that. If you haven’t, you, yo homeboys and homegirls all need to run and check out the work I put in on this DIY graphic hoodie with faux leather appliqué!! It’s the dopest concept - that I’ve physically made - in a while and it came from sheer and honest creativity so I appreciate it that much more.
Not even a week before my next video was supposed to go live, I thought “Wouldn’t a tonal applique be dope? That quickly evolved into, “What if I used one of my hoodies?” And from there, I went to affirming “I can use the faux leather fabric in my stash,” and googling how to DIY an applique and a pick up order was placed at Joann’s by the end of the day.

Design
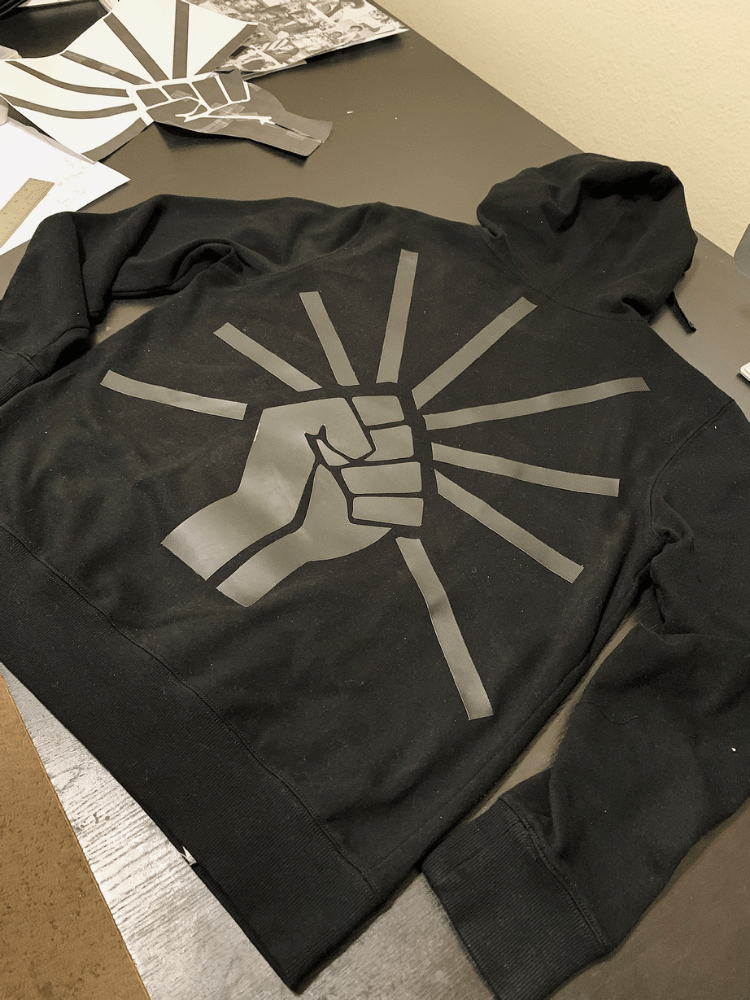
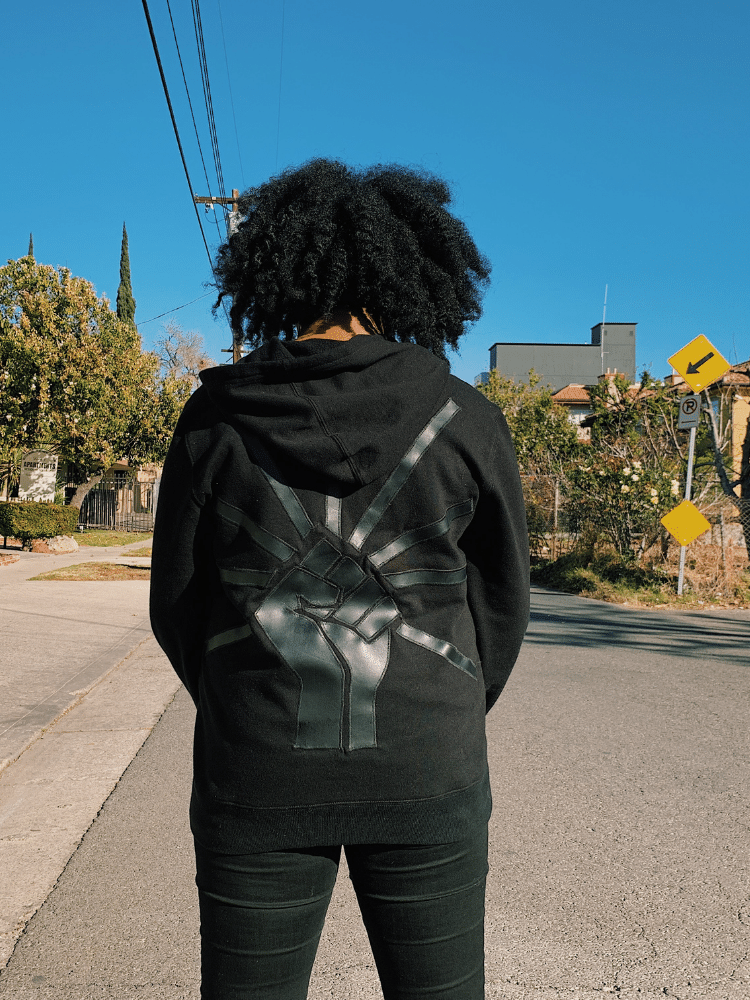
Originally, my plan was to only use the faux leather as a tonal applique with a short phrase across the chest and the black power fist on the back. I jumped back and forth between Black Pride and Black Power but they didn’t sit right with me. Not that there’s anything wrong with them...the phrases just hold a lot more energy and fight than I wanted to be projected on my body. The last thing I want is someone engulfed in negativity coming up to me, asking me about Black Pride and Black Power.
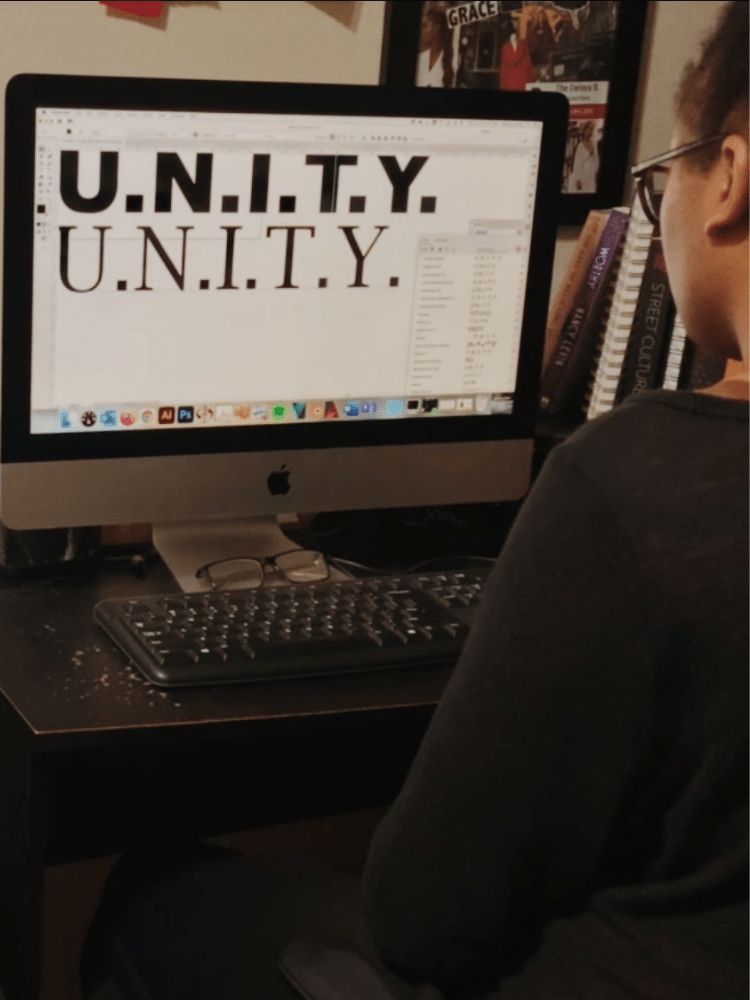
I was tittering on Black Excellence when I started to create a list of what Black and being Black means to me. I listed Proud, Beauty, Strong, Resilient, Hope and Unity… The thought of unity transposed itself into Queen Latifah’s song U.N.I.T.Y. and that’s where we planted our seed. Being overly familiar with the chorus and not the actual verses, I took a listen and the song is about respecting black women and black women standing up for their value. For our value.


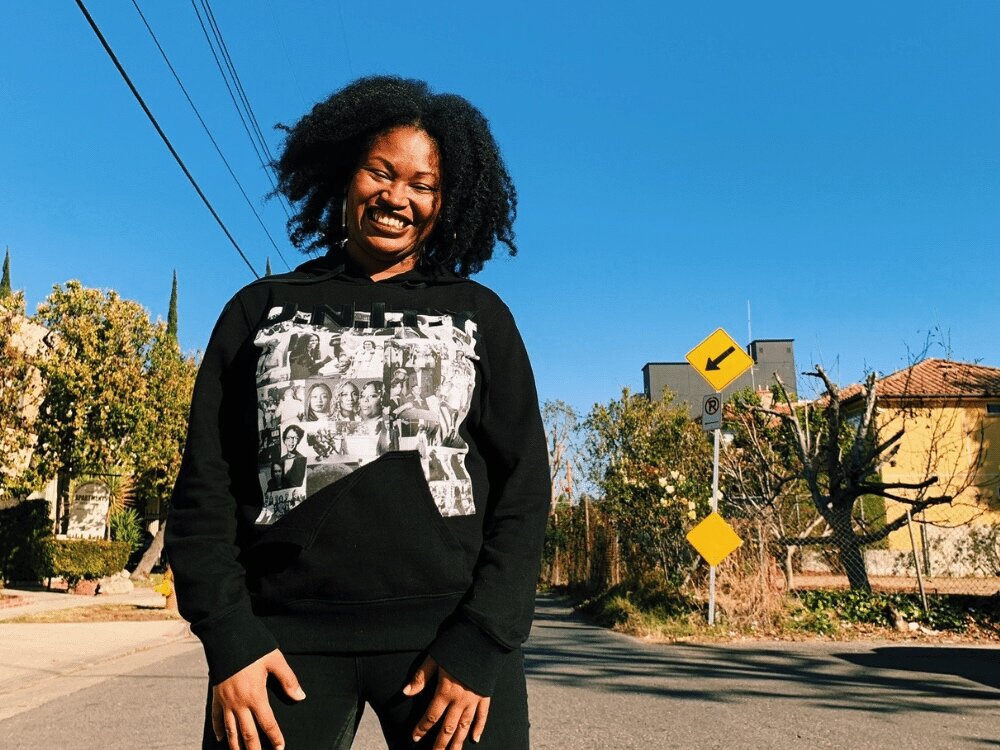
It took me back to my “I AM MAN” design concept and how black women fight for the struggle but still have our own wounds to mend and scars to bare. Then I started thinking about Kamala Harris being the first black female vice president and the women who had to show up to fight and be heard to get her there… That’s where the collage idea sprang up and I wanted to honor at least some of these women.
The photo collage features Kamala Harris, Michelle Obama, Mamie Till Mobley, Correta Scott King, Claudette Colvin, Maude Ballou, Elaine Brown and Angela Davis to name a few. There were so many other notable women I definitely could’ve added and them not being on the graphic isn’t a slight to their work and achievements. It was just a last minute DIY graphic hoodie so I didn’t allow myself the time to properly research. The downside to a DIY quickie.
Materials
Black Hoodie (T-shirt or crew neck pullover will also work)
Faux Leather (enough for your design; I used less than 30” x 30”)
Dark Photo Transfer Paper
HeatBond Lite Iron-on Adhesive
Tools
Clear Ruler
Metal Ruler (Recommended)
Tape Measur
Fabric Scissors
Paper Scissors
X-acto Knife
Cutting Mat
Sewing Machine: Similar (Mine is old and no longer available)
Teflon Presser Foot
Iron

How to Do an Iron On Photo Transfer
Follow the instructions of the photo paper. Read the instructions, twice if you need to, and proceed from there. Different photo paper brands may ask you to do things differently than mine did, like mirror your image when you print and won’t require you peel a backing sheet before ironing it on. Before you get too far ahead of yourself, take the time to read the instructions.
1. Create your artwork.
I used Adobe Illustrator to whip my graphic into shape but you can easily use Adobe Photoshop or even Canva. It may be a little difficult to line up multiple pieces on Canva but I’m sure it’s not impossible.
Be mindful of the size of your graphic or photo. You want to make sure it fits the space on the hoodie and not look too big or too small. My first test collage was way too big for the hoodie. It passed the waistband. The second printout and the size I ended up going with was still too wide in my opinion but here we are.
2. Check placement
Test your graphics sizing and placement by printing out the graphic on regular paper. Layout the printout on your hoodie and write down the measurement from the HPS (High Point Shoulder - shoulder point closest to neck) to where your graphic will land. Measure the right and left to make sure everything is even across the chest.
3. Follow the instructions
Once you’ve finalized your graphic, follow the instructions on the photo transfer printing paper to finish up.

TIPS FOR PHOTO TRANSFER GRAPHIC
1. Follow the instructions of the photo transfer printing paper.
2. Have extra photo transfer paper to test. The packs I used came with 5 sheets each and I knew I had to cover a lot of surface area so I bought 2 of them. Good thing I did because I messed up enough times to where I wouldn’t have had enough to finish the project like I planned.
3. Measure the top of your graphic from the HPS (High Point Shoulder - shoulder point closest to neck) and also the sides to make sure everything is even and centered. My blank was defective so even though I measured the HPS and they were equal left and right, the bottom of the collage was wonky. Not to mention that the pocket on the hoodie was off center too so it was blatantly obvious that things didn’t look even.
4. If you’re attempting to line up different sheets because your graphic is too big for the 8.5” x 11” photo transfer paper, then you might want to try to get the edges to overlap just a hair before ironing down. I think the graphic may have shrunk when pressing down or shifted because there’s a 1/16th gap where the collage just didn’t line up well enough.


How to Do a Faux Leather Appliqué
Again, I’ll start by insisting that you follow the instructions written on the heat bonded adhesive. Someone took time to write those words out so let’s respect it.
1. Create your phrase or design template.
This can be done by hand or the computer; I used Adobe Illustrator to make sure the sizing stayed consistent, the graphic was balanced and because it was simply faster.
2. Check your placement.
Test your graphic by printing it out on regular paper and laying it on the hoodie how you’d like. Take necessary measurements from the HPS and sides of the hoodies and write them down.
3. Print out templates.
Print out your shapes and/or letters you want to use for your applique.
4. Follow the instructions.
Iron the adhesive onto the back of your fabric. Make sure that it’s secure and no spaces or air pockets were missed.
5. Cut out pieces.
Take the printed out templates and tape them to the back of the adhesive paper. Make sure it’s secure and cut around the shape using it as a stencil. If you have letters, some will need to be taped backwards in order for the applique to show properly on the hoodie.
6. Layout and press.
Once all your pieces are cut, iron them down to the hoodie. Continue to follow the directions on the adhesive in how to go about that.
7. Apply the applique.
Stitch down each piece using a zig zag stitch. The closer the better for an embroidered edge but do what suits your graphic. I opted out of the super close zig zag because I was worried about minor mistakes being super visible. My stitch height was set to 5 and zig zag width was set to 1.


TIPS FOR FAUX LEATHER APPLIQUE
1. Test. Test. Test. Test your ironing, test your zig zag stitches, test on curves and whatever else you’re not feeling too confident about. Figure out your plan of attack before you get to the last steps.
2. When sewing, try to have a reference point to keep your stitches evenly placed and similar. I used the center gap in my teflon presser foot as my guide. I tried to keep the gap in the foot lined up to the edge of the leather piece as I was appliquing.

Sewing
There wasn’t much sewing involved with this photo transfer hoodie and faux applique DIY. I did seam rip the top of the pocket so the whole collage graphic could fit on the front of the hoodie.
To keep the graphic from looking obviously off centered, I left the pocket a little deconstructed. I clean finished the top of the pocket using a sewing machine stitch similar to an overlock stitch. Then I sewed the top of the pocket back to the hoodie about 1 ½” in and let the rest hang open.
Critique
I am definitely wearing this hoodie out. I couldn’t have asked for better results.


Evaluation
The applique came out great, especially for it being my first attempt ever. I couldn’t be more proud. The curves and angles of the pieces may look a little stressed but that’s alright! I’ll probably even do it again since I have more photo transfer paper and iron on adhesive left.
View
I recorded the full process of this DIY photo transfer graphic hoodie and faux leather applique. You can watch every single step and every single test I did while creating this hoodie by watching this video.